|
|
|
|
|
|
Parameters Window
Parameters Window Index
Top 8 Boxes
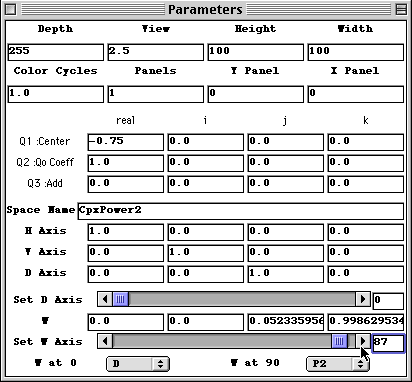
- DEPTH
Recall that fractals are typically generated created by taking a sequence of numbers for every pixel you want to draw. The length of that sequence is often determined by some condition, like "Stop when you reach a number in the sequence that is bigger than or equal to 2.". What if the numbers in a sequence never get bigger than 2? You have to eventually give up and move on. "Depth" is that limit for the fractal loops I" created with JavaQuat.
At a more basic level, "depth" is one of the arguments that is passed into the looping function that computes the fractal. If you are going to write your own loop you can use it as you choose. The value from your loop should be no bigger than "depth" though. JavaQuat expects you to follow that rule.
- VIEW
When you are looking at a fractal, you are often looking at a relatively small section of the complex plane, or some other mathematical space. The value of "vies" tells you exactly how much you are looking at in the horizontal direction. Therefore, if you make the "view" value smaller it"s like increasing the magnification. The picture will be drawn the same size but it will cover less ground, so to speak. If you want to "zoom" out from a fractal scene, increase the number for "view". Most often when you want to zoom in you will do so by dragging the mouse across the part of a fractal you want to enlarge. If you watch, you will see that the "view" value decreases.
- HEIGHT
This is how many pixels high you want the picture to be drawn. If you are using a fixed width to height ratio the height may be adjusted a bit from what you type in in order to get the ratio you selected.
- WIDTH
This is how many pixels wide you want the picture to be drawn. If you are using a fixed width to height ratio the width may be adjusted a bit from what you type in in order to get the ratio you selected.
- COLOR CYCLES
There are 256 colors available in the color map. The last one is usually reserved for a backbround color, leaving 255. But if your "depth" is set at 1021 you have a variety of choices about how those 1021 values get changed into those 255 colors. You might want 1, 2, 3, and 4 converted to the forst color, and so forth. That would take you through all the colors once as you went from 1 to 1020, and then 1021 is the background color. You might move to the next color with each number from 1 through 1020. In that case you would cycle through your 255 colors 4 times. You get to set the number of times you cycle through the colors with this argument.
- PANELS
If you want to draw a fractal that is ten thousand pixels by twelve thousand pixels, it is going to take some time. You may want to do it over an interrupted period of time. JavaQuat lets you draw in sections called "panels". By setting the number of panels to 25, say, you could draw the large fractal picture you want in 625 (that is 25 wide by 25 high) sections, each 400 by 480 pixels in size. Then you can draw any of the 625 panels of your picture by setting the "" and "" described below using values from 0 through 24 for each. You can also enter numbers not in that range and you will get the appropriate panel drawn, though of course, it be outside of your original picture. With 625 panels to draw, you may want to automate the process.
- Y PANEL
This chooses the panel vertically. See the description under "PANELS" above. This also displays the vertical position of a panel in automatically generated sequence of panels.
- X PANEL
This chooses the panel horizontally. See the description under "PANELS" above. This also displays the horizontal position of a panel in an automatically generated sequence of panels.
Q1, Q2, and Q3
JavaQuat was originally designed to draw fractals using the formula
Zn = Q2 * (Zn-1)p + Z0 + Q3
where the Zs of the sequence, Q2, and Q3 could be points in an up to 4 dimensional space, and Quaternion space in particular. The first element of the sequence, Z0, is known as Q1 in the parameters window.
You can set these values as you choose. Of course, when you are dealing with a 2 dimensional space the R and i columns are typically the only ones that do anything.
There are exceptions, however. When dealing with a GIF Trap fractal loop, I have used some of the j and k column values to position, rotate, and scale the GIF picture within the complex plane.
Each fractal loop has the option to chose the labels at the left of the rows and choose column titles across the top of what I normally think of as the R, i, j, and k components of Q1, Q2, and Q3.
Normally, however, each Q is a point in a 4 dimensional space and the values you choose for them determine what you see, at least in part.
Space Name (loop)
I have refered to the various fractal loops. They are Java code, that have at their hearts some way of taking in Q1, Q2, and Q3, or values near them (see "Picture Axes" below), and the "depth" value and producing a number from zero to depth as output.
If you pick a selection from the "Loops" menu of a drawing window the selection will appear here. You can also type a value in. It can be any of the menu values or the name of any fractal loop that you create yourself.
Picture Axes
As mentioned above, each of Q1, Q2, and Q3 is typically a 2 to 4 dimensional space. The picture you draw with JavaQuat is a 2 dimensional slice of the higher dimensional spaces. Just what slice is determined by the values that appear in the "H Axis" (horizontal) and "V Axis" (vertical) rows. The boxes in each row represent the relative amounts of change in the different dimensions as you go from pixel to pixel either horizontally or vertically. From left to right the values are for the real, i, j, and k axes of the space Q1, Q2, or Q3. Which space is being sliced is determined by the "Scan On" selection in the "Settings" of any drawing window or the parameters window.
Typically, for complex plane spaces only the real and i components have any effect. For 3-D spaces k is unused.
D and W Axes
The D axis is always perpendicular to the horizontal and vertical axes. Although D stands for "depth" it has nothing to with the fractal sequence depth that is controlled by the value in the "depth" box in the upper left corner of the parameters window.
When you do a pivot animated sequence, say around the vertical centerline of your first frame picture, after 90 degrees of rotation the horizontal axis will be pointing in the directionof the D axis. In a 3 dimensional space there is only one direction that is perpendicular to any given choice of horizontal and vertical axes. In a 4 dimensional space you have to choose. There are always two directions that are not only each perpendicular to the horizontal and vertical axes, they are also perpendicular to eachother. These are labeled as "P1" and "P2" in JavaQuat. There are an infinite number of ways to pick P1 and P2. JavaQuat chooses them in a systematic but somewhat arbitrary manner.
You can choose D to be either of them or anything inbetween. To pick P1 move the slider under the D axis display to the far left or type 0, then Return in the box at the far right end of the D axis slider. To pick P2 move the slider under the D axis display to the far right or type 90, then Return in the box at the far right end of the D axis slider. Other slider positions or typed numbers of degrees will produce intermediate results.
The value showing in the D axis when you set up a pivot sequence is the direction in which the 2 dimensional slice that is your picture will turn from frame to frame when the pivot sequence is drawn.
The W axis can take on any value, but it can be easily chosen to be your choice of a mix of any of the other axes. While D is some mix of P1 at one end of the slider and P2 at the other end, You get to choose what is at each end for W. The choices are made on the bottom row of the window and can be any of the axes H, V, D, Mem H, Mem V, P1, and P2.
The W axis value that you choose can be copied into either the H or V axes, chich control what will be drawn. This is done from the "Axis" menu.
In a shift animated sequence the shift is always in the direction of the W axis. This can be used to pan the picture by setting the W axis to some combination of the horizontal and vertical axes. It can be used to take successive slices in back of, or infront of, a given picture is W is some combination of P1 and P2.
|
|
|